
The Importance of White Balance and Underwater Photography
Most of us have heard the term “white balance” but do you know what it is and how it affects your underwater photography? White balance, more importantly, having the correct white balance, is an essential element of capturing great underwater images. Are your underwater images always tinged with blue? Are the colors portrayed in your images not matching up to the incredible spectrum of colors you see with your own eyes when diving?
The chances are that your white balance is not set correctly and with a few simple adjustments, we can help to get you back on track. If you are wondering what white balance is, when you should you use and how to set it, read on and we’ll explain the basics!
What is white balance?
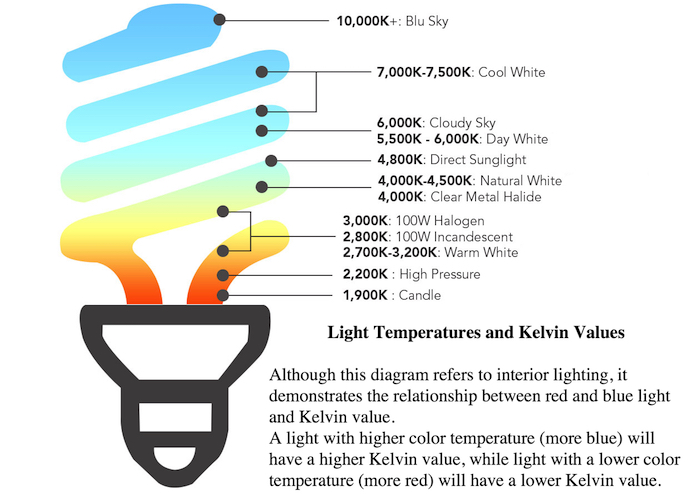
White balance is a concept of color temperature. Color temperature is a way of measuring the ratio of blue light and red light within an image. A light with higher color temperature (more blue) will have a higher Kelvin value, while light with a lower color temperature (more red) will have a lower Kelvin value. A color temperature of 5500 – 6500 K is average daylight. To put it more simply, white balance is a camera setting that adjusts for the current lighting conditions in order to make white objects appear white in photos & videos.
Why should I custom white balance?
If you want to get rid of the blue tinges in your images and to capture colors in your images which are as vivid as those which you see when diving, you need to address your white balance. Custom white balance is used to achieve the most accurate color in an image as possible. To the human eye, a white object looks white regardless of the type of lighting.
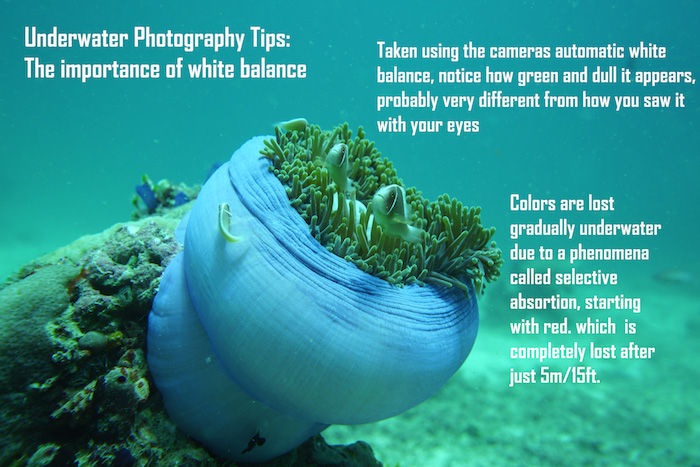
However, digital cameras can get confused with white, resulting in unnatural looking colors (especially underwater when it can appear blue due to the loss of red as we go deeper). When we set a custom white balance, we are essentially telling the camera what “white” is. By doing this, the camera re-calibrates the spectrum of colors based on the white we imported. This renders the proper colors as we expect to see them.
Digital cameras offer a menu of different white balance options. Some of these options include auto, tungsten, daylight, cloudy, flash, fluorescent, shade, underwater, or custom. The best choice is to use the ‘custom’ white balance setting and import the data manually. If custom white balance is not available on your camera, then choose either the underwater setting which will add red back into your images (if available) or the cloudy setting.
Automatic white balance is not a solution for shooting underwater unless accompanied by external strobes or video lights
How do I custom white balance?
Setting the white balance during your dives is easier than you might think. Many compact and mirrorless cameras have “one-touch” white balance features. Start by choosing your camera’s custom white balance setting, then point the camera at something white (for example, a slate, sand, white fins etc.) and make sure you fill the frame with your chosen white object, then press either menu or shutter (it can vary from camera to camera).
Each camera has its own way of setting a custom white balance so refer to your manual for the proper procedure. Your camera will then recalibrate according to the data which you have just imported. For DSLR cameras the process may involve a few steps for setting a custom white balance. Generally, you have to take an image of something white, import that image as the custom white balance data then select the custom WB icon. Again, refer to your camera’s manual for the exact procedure.
When and how often do I need to set the custom white balance?
Whenever you set your custom white balance your camera will continue shooting according to the data which it imported – even if the conditions around you change. When diving, colors and available ambient light change whenever you change depth, so you will also need to reset your custom white balance each time you go deeper or shallow up. On average, it is recommended that you reset your custom white balance at around every 10 – 15 feet.

By using your manual white balance you can recalibrate your cameras interpretation of color
Are there any other solutions?
Using external light sources such as video lights and strobes also combats color loss. Another option that is particularly useful is an external red filter (see image below). By shooting through the red filter you are manually adding red to what your camera would otherwise “see” underwater.
Can I fix white balance issues in post-processing instead?
During post-processing, it is possible to address white balance issues to some extent. If your images are “blued out” you can correct this by increasing the amount of red in the image. It is important to note that some basic editing programs allow you to increase the amount of a color in an image, but not add in a color that isn’t there in the first place.
So if you have images taken at 20 meters with no red in them at all, it may not be possible to add any in. For these reasons, it is always best to try and solve as many problems as you can while shooting, rather than relying on post-processing which can lead to unnatural or exaggerated looking images. Post-processing is actually another skill in itself!
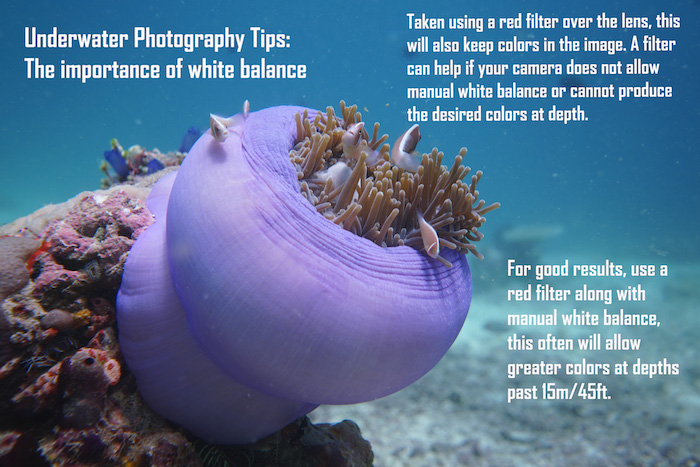
A red filter manually adds red to your images to achieve more accurate colors
Here are some tips to remember for custom white balance:
- Make sure you carry something white to use to set your custom white balance (slate, white fins etc)
- Keep the sun to your back when setting your custom white balance
- Point your camera at a slightly downward angle (this takes full advantage of the available sunlight)
- Remember to switch back to AUTO white balance when using strobes or video lights
- Recalibrate your white balance every 10 – 15 feet
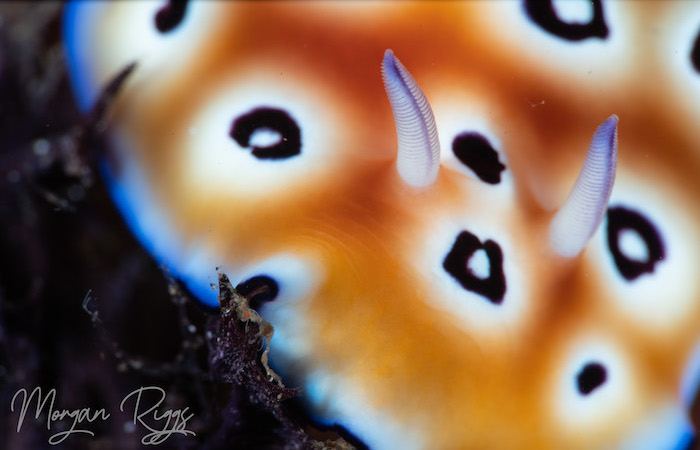
This image is correctly balanced with the white patches on the nudibranch appearing perfectly white
Are you planning your next diving scuba diving holiday in Indonesia? Did you know that North Sulawesi is where you will find some of Indonesia’s most famous diving areas including the Bunaken Marine Park, Bangka Island and the Lembeh Strait?
Why not join us for a Passport to Paradise and explore all three of these phenomenal regions in one trip? Boat diving transfers from resort to resort ensure that no diving days are lost due to travel, and you’ll dive at some of Indonesia’s most iconic dive sites along the way – the underwater photography opportunities are endless!
For more information about the staying and diving rates at any of our resorts in North Sulawesi, contact us at reservations@murexresorts.com. We look forward to exploring North Sulawesi with you soon!
Thank you to underwater photographer Morgan Riggs for the wonderful images and infographics included above.